RSS

Monthly Archives: September 2010

About Dojo

About Dojo

Asalamu Alaikum,

This is Saad Talaat,

How are you?? :).

This time not as i promised last time sadly to talk about the tooltip plugin enterprising…but i will start talking about Dojo and then will give you the main idea of how to enterprise the previous tooltip plugin.in  a next topic..

Anyway Let’s start with Dojo :). before i begin i gave a session about that 2 or 3 months ago..but sadly few have attended so i am gonna talk about it here :).and here is the slide

http://static.slidesharecdn.com/swf/ssplayer2.swf?doc=session-100813084545-phpapp01&stripped_title=session-4961258&userName=SaadTalaat

First What is Dojo ??

Dojo is a Javascript framework not a library which actually depends most on Ajax development for doing it’s marvelous tweaks it’s main job is to program a semi-Dekstop applications over web and it is sooo good in doing that,it also does a good job doing widgets and all of that is open source..

Dojo Also supports all browser which library like jQuery can’t do..and Dojo’s UIs also supports all browser unlike jQuery UI the current version at least the accordion has a pathetic look on the IE browser..but Unlike jQuery Dojo only have 3 themes for it’s UIs but also Unlike the jQuery UIs they arn’t just different in color they are also different in shape.

To be more honest the Dojo’s UIs arn’t UIs they are more like a look and feel for a desktop application over web..

Dojo also provides it’s application with alot of desktop applications facilities like resizing for example table panes…actually a normal table can be a table pane just with changing the dojoType attribute of the table

also those dojoType attributes are gonna disappear soon with html5’s custom attributes they are gonna be deprecated..

Dojo is Used by AOL – IBM – SUN (not anymore sun)- Cisco

anyway let’s see a hello world application 😀

Simply our application will have a button and onclick a message box with hello world comes out.

<html>

<head>

<title>bla bla</title>

<link ur css….. />

<script src=”dojo/dojo.js” language=”javascript”></script>

<script language=”javascript”>

dojo.require(“dojo.fx”);

dojo.require(“dojo.Nodelist-fx”);

function efx(){alert(“Hello WOOOOOOORLD!!”);}

function init(){var h=dojo.byId(“btn”);dojo.connect(h,”onClick”,efx);}

dojo.addOnLoad(init);

</script>

</head>

<body>

<button id=”btn”>Hello</button>

</body>

</html>

The previous code only does a hello world message the html is quite clear i think let’s start from the 1st script tag

we import the main dojo script that compile or interpret actually

we open another script tag then we require the what?!!!!!!!!!!!

it’s like importing in java but if u went to folder dojo u will find the next names as js files…so instead of writing a big script tag u just require it by dojo so if u went to folder dojo u will find file called fx and nodelist-fx so we just import scripts…anyway

we required fx script which is resonsible for effects…fadein..slide..etc nodelist is an api like the $() function in Jquery u just use query function like this

dojo.query(“.class,#id”);

we actually won’t need those scripts am just showing the structure of the dojo code…

anyway

we defined a function that shows a message box

and the next function…dojo.byId!!! yea that is just like document.getElementById!!

then connect….yup 🙂 you can connect the (object,”onevent”,withfunction);

and can connect 2 objects too which i will talk about later..

then we addOnLoad the init function to be invoked or u can use anonymous function inside it the init() function….

i guess it’s quite clear now xD >.> ^.-

to be continued…

Regards,

 
Leave a comment

Posted by on September 30, 2010 in Front-end, Web


Tags: , ,

Structring a tooltip javascript plugin

Structring a tooltip javascript plugin

Asalamu Alaikum,

This is Saad Talaat.

As the title says we are structuring a tooltip javascript plugin, but what is the point with that??
Actually it’s not about tooltips, I’ve been workin on that recently but after i got done was done with that…i found that it would benfit much people to get to know the javascript more :).and i found talking about my experience would help some people not to fall in these bugs..
Why i am not doing that with JQuery. cuz actually i am the type that like doing his own stuff!!

Anyway let’s start 🙂

First as a study to what tooltip do.
it appears only while mouse is over an titled element…but what we want is to create our own tooltip adjusted the way we like.

First we are gonna need our old getElementByClass.
for tooltip we need a function that creates a tooltip…a function that removes tooltip and a function that position tooltips and a function the initalize events.( the elements that are enabled to show the tooltips will be with class name)

to start with creating those Tooltips

function puttp(p){
var h=document.createElement(“p”);
h.innerHTML=innerHTML=p.attributes[‘title’].nodeValue;
title=p.attributes[‘title’].nodeValue;
p.attributes[‘title’].nodeValue=null;
h.setAttribute(“class”,”tooltip”);
document.body.appendChild(h);
}

Ok here is what we’ve done!!we are reciving one param which is the object that will use our tooltip. we created a paragraph element. and it’s text will be the param’s title. and we stored our title into a var named title and then we removed it from the old element so we won’t have multiple tooltips. and we setted the class attribute of the tooltip as tooltip so we can style it later

.tooltip{
position:absolute;
background:yellow;
padding:10px;
font:.8em verdana;
}

That was my style…it’s a bit simple you can change it the way you want.

function rmvtp(p){
var h=document.getElementsByClass(“tooltip”)[0];
document.body.removeChild(h);
p.setAttribute(“title”,title[title.length-1]);
title=undefined;
}

That is the removing function..it should take the element that has a current tooltip shown as a param. of course since we have one tooltip we need to call the 0-indexed element of our class array.then we will remove it from the body and we are gonna let our element to retrieve it’s old title attribute value.and we will reset our title variable…so far so good!!

function position(e){
var j=document.getElementsByClass(“tooltip”)[0];
j.style.top=e.clientY;
j.style.left=e.clientX;
}

This is the positioning function which is quite really easy :). we just will keep our absolute positioned tooltip to these coords.

function init(){
var i;
for(i=0;document.getElementsByClass(“tp”)[i];i++){
if(document.all){
document.getElementsByClass(“tp”)[i].attachEvent(“onmouseover”,function(){puttp(this)});
document.getElementsByClass(“tp”)[i].attachEvent(“mouseout”,function(){rmvtp(this)});
document.getElementsByClass(“tp”)[i].onmousemove=position;
}
if(document.getElementById){
document.getElementsByClass(“tp”)[i].addEventListener(“mouseover”,function(){puttp(this)},true);
document.getElementsByClass(“tp”)[i].addEventListener(“mouseout”,function(){rmvtp(this)},true);
document.getElementsByClass(“tp”)[i].onmousemove=position;
}
}
}

Then we are initializing our events to the objects. so as long as we have an array elements that holds a value loop.and then we intialize the events so if (document.all) it means if (our browser is IE) cuz document.all is a Microsoft Standard we attach events on the way they are attached on IE.
and if(document.getElementById) it means if(our browser is one of the good side (FF-Chrome-Opera-Safari) which use DOM standards) we attach events on the DOM standards way :).

And then invoke the function init or add it to load event to body.

Anyway our simple tooltip plugin won’t work with nested elements(if you nested an element which uses our tooltip in an element which does that too).
Because there is nothing to hold an extra tooltip data(we have one title variable) so if we hover the inside element with disabling bubbling in our EventListener it will show the inside tooltip but without restoring the parent’s title..so it’s title is lost so if we hover it again…we will be having an empty tooltip.but if we enabled bubbling.when we hover in the inside element the tooltip will be holding the parent’s title..cuz it’s the last it met.. and when we hover out…we will be having nothing.

So in this point an idea comes to your mind why not array??.and push and pull everytime we get inside an element

Actually this process in Javascript will be asynchronized so while we are pulling (or actually deleting) the last element we used javascript will be still holding this index’s value as undefined.and also when you are pulling the last title to restore it,cuz of being asynchronized you may be pulling the undefined element..on the other side the parent element will still be having the event triggered ON!! so it’s title won’t be restored…

so give it a thought till we meet in the next post 🙂 .

 
Leave a comment

Posted by on September 19, 2010 in Front-end, Web


Squash & stretch التمدد والتقلص

Squash & stretch التمدد والتقلص

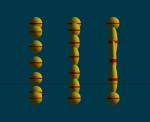
هذا المبدأ يمكن أن يطبق على أى شئ, فمثلا يمكن أن يطبق على كره نطاطه او على جسم كركتر أو سياره ولكن يجب ان تراعى ان المبالغه يضفى جو كرتونىأى انه اذا كنت تعمل فى فيلم واقعى فلا يجب ان تزيد من هذه الخاصيه على اﻷجسام التى تقوم بتحريكها

هذا المبدأ يمكن أن يطبق على أى شئ, فمثلا يمكن أن يطبق على كره نطاطه او على جسم كركتر أو سياره ولكن يجب ان تراعى ان المبالغه يضفى جو كرتونىأى انه اذا كنت تعمل فى فيلم واقعى فلا يجب ان تزيد من هذه الخاصيه على اﻷجسام التى تقوم بتحريكها

غالبا عمليات التمدد والتقلص تكون مصحوبه بال

motion blur

وذلك اثناء الريندر ﻻعطاء جو من التماسك لاعطاء نوع من التأثير الفنى

لاحظوا هذا المثال فيه عمليه تمدد مبالغ فيها

لاحظوا كيف ان التمدد المبالغ فيه احدث تشوه بالمشهد ولكن مع البلور سوف يختفى هذا التشوه وتبدو كرتونيه الى أقصى حد

وبعد فهم هذا المبدأ يمكن تطبيقه على كل شئ فبطن الكراكتر مثلا أثناء القفز تشبه كثيرا الكره فى حاله التمدد والتقلص وأى شئ تقريبا يمكن تطبيق هذا المبدأ عليه فى أجزاء الكراكتر المختلفه مثل رأسه ورجليه

لاحظوا الصوره

ويقول شاون كيلى فى كتاب مدرسة التحريك ﻷنيميشن منتور انه كان يقضى نصف وقته فى التخطيط للمواضع التمدد والتقلص التى سيقوم بها ويقوم بعمل رسومات وتخطيطات مفصله للتايمينج ليكون عمله سهل جدا عندما يبدأ العمل على برنامج التحريك الذى يعمل عليه

غالبا عمليات التمدد والتقلص تكون مصحوبه بال

motion blur

وذلك اثناء الريندر ﻻعطاء جو من التماسك لاعطاء نوع من التأثير الفنى

لاحظوا هذا المثال فيه عمليه تمدد مبالغ فيها


لاحظوا كيف ان التمدد المبالغ فيه احدث تشوه بالمشهد ولكن مع البلور سوف يختفى هذا التشوه وتبدو كرتونيه الى أقصى حد


وبعد فهم هذا المبدأ يمكن تطبيقه على كل شئ فبطن الكراكتر مثلا أثناء القفز تشبه كثيرا الكره فى حاله التمدد والتقلص وأى شئ تقريبا يمكن تطبيق هذا المبدأ عليه فى أجزاء الكراكتر المختلفه مثل رأسه ورجليه

لاحظوا الصوره

ويقول شاون كيلى فى كتاب مدرسة التحريك ﻷنيميشن منتور انه كان يقضى نصف وقته فى التخطيط للمواضع التمدد والتقلص التى سيقوم بها ويقوم بعمل رسومات وتخطيطات مفصله للتايمينج ليكون عمله سهل جدا عندما يبدأ العمل على برنامج التحريك الذى يعمل عليه

 
Leave a comment

Posted by on September 16, 2010 in 3D Design, Graphics


Introduction to Bash Scripting

Introduction to Bash Scripting

I’ll Give you a simple introduction to Bash Scripting ..

Before I talk about scripting,…Allow me to tell you a little about bash..

Bash is a CLI (Command Line Interface) Shell , that is a software that provides an interface allowing you  to access the services of the kernel

“Simply a program that allows you to execute other programs”

If you want to know more about it please check these links :

http://en.wikipedia.org/wiki/Bash_(Unix_shell)
http://en.wikipedia.org/wiki/Shell_(computing)
or  Google it .

Moving on..

I once Ran into a book “Apress.Pro Bash Programming Scripting GNU Linux shell” and I’m still reading it…the thing about this book is that the author created a menu driven, user extensible data base system with a report Generator Just using shell scripting…I still dont have a clue how, but I sure do want to know ^^”

So why am I saying this?

Well,I think it proves how powerful shell scripting could be..this man really got me interested in shell scripting.

>>Now Let’s Start:

The example I’ll work on is a script for creating script files :)…You propably know that the main purpose of scripts is to automate .

1- –ofcourse- you’ll create a file ..  many people tend to create a /bin directory for the user… so move to the home directory and create the /bin

#: mkdir /bin
——————————–

#: cd  /username/bin

#: touch cshell

——————————–

most people use .sh as an extension to distinguish script files, it doesn’t really make a difference .. for now..

2now to edit the file

** use vim , nano , gedit whatever suits u best…If you are not used to CLI stick with gedit for now

——————————–

#: gedit cshell

and type the following:

#!/bin/bash

touch $1

chmod +x $1

and save it.

——————————–

**#! : tells the system which interpreter will be used to execute a file .

**touch: is a command that creates files.

**$1: a script can recieve arguments..labeled starting $1…so this refers to the first argument it’ll recieve.

**chmod  +x $1 : change permissions of this file to executable

3-Make the file executable

——————————–

#: chmod +x cshell

——————————–

now…If u are in the directory this file was created , if u type “#:  ./cshell  file1 “

it will create a file named file1 and make it executable .

saying that you want it to be executed like a command , when you type in  a command the shell searches for it in directories stored in $PATH variable so you just have to

store your directory in the PATH variable ... to do so :

——————————–

PATH=$PATH: “the directory”

e.g :

PATH=$PATH:/home/menna/bin

——————————–

BUT…this modification will be lost if you logout “On Fly” ..if you want to be permenant just add the previous line to “.bashrc”

how??

move to your home directory

#: cd

edit the file

#: vim .bashrc

add the line

PATH=$PATH:/home/menna/bin

save and u’re done!

——————————–

to save all this just create the file in /bin …. it’s in the $PATH by default, but u’ll have to be root

now that u’re done move anywhere and type

#: cshell first

and a new executable file named first has been created :)…

That’s it…it’s  your first bash script ..

 
1 Comment

Posted by on September 8, 2010 in Linux


التوقيت Timing

التوقيت Timing

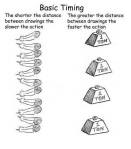
التايمينج هو أهم مبدأ من مبادئ التحريك وهو كما يقول ريتشارد ويليامز أسهل شئ فى الشرح واﻷصعب فى التطبيق وهو الذى يحدد الريتم والشخصيه للكائن

حيث ان التايمينج يحدد ثقل المجسد وصلابته ونوعه وسرعته كل ذلك يتم تحقيقه من خلال التلاعب فى التايمينج والاسبايسينج وكل شخصيه تتميز بالتايمينج الخاص بها

Read the rest of this entry »

 
Leave a comment

Posted by on September 5, 2010 in 3D Design, Graphics