RSS

Category Archives: Back-end

your first step with ZK

your first step with ZK

peace be upon all


ZK in a glance

ZK is a highly productive open source Java web framework for building amazing enterprise web and mobile applications. Its unique Sever+client Fusion architecture enable developers to write applications using pure Java, design UI in XML while having optional control to the client side. ZK’s true event-driven model reflects desktop programming shielding developers from JavaScript programming, cross-browser issues, complex Ajax communication and the danger of exposing business logic.

ZK  also have alot of other products along with the framework

ZK  : web framework 

ZK mobile : extends the reach of Web applications to billions mobile devices supporting Java Mobile and Android.

ZK studio and ZTL tools :  visual IDE plugin for Eclipse and testing suite

ZK spreadsheet , ZK calendar : ajax application component

ZK Pivottable : Ajax web component for summarizing raw data


Why ZK ?

1- ZK is the leading enterprise Ajax framework and the easiest way to build great modern Java web applications.

2- Enterprise. Trusted. Established.

3- End to End Productivity Boost

4- Industry Leading Architecture

5- Transparent Ajax with Jav6- Rich Modular UI

7-  Fortune 500 Approved Security


Getting Started !

  • ** installation
    – u can  download and run on any IDE , but assume using netbeans , u need to download the REM plugin from here
    – start netbeans , on main menu bar select Tools >> plugins
    – click on downloaded tab >> add plugin , then navigate to where REM is downloaded and select it
    –  click install
  • ** create Netbeans demo ZK project
    – new project >> samples >> java web >> zk509 Demo application >> write the project name and click Finish
    – this is a demo project to explore the different component of the framework
    – click run and Enjoy 😀

>> <<  To can create a new project and use the palette to explore the different tools

>><<  more on   http://www.zkoss.org/


Leave a comment

Posted by on March 27, 2012 in Back-end, Featured, Programming


Tags:

HMVC -Examples-2-

HMVC part two with examples

For Experienced developers in codeigniter

Hello ,

Now that we have our HMVC enabled instance of CodeIgniter , if you don’t know how to do that please check the following link
First let’s examine some examples
We will made in this tutorial hmvc  example login module

1-  First create the “login” folder module in our “hmvc_ci/application” directory. It should end up looking like this in your web directory

  1. hmvc_ci/application/modules/login/models/
  2. hmvc_ci/application/modules/login/views/
  3. hmvc_ci/application/modules/login/controllers

2-  Second   Create the “site” folder module in our “hmvc_ci/application” directory. It should end up looking like this

  1. hmvc_ci/application/modules/site/models/
  2. hmvc_ci/application/modules/site/views/
  3. hmvc_ci/application/modules/site/controllers

3-    Copy this files to your login module you

Note  : can download source code for this code from here

  1. hmvc_ci/application/modules/login/models/membership_model.php
  2. hmvc_ci/application/modules/login/views/login_form.php
  3. hmvc_ci//application/modules/login/views/signup_form.php
  4. hmvc_ci//application/modules/login/views/signup_successful.php
  5. hmvc_ci//application/modules/login/controllers/login.php

4-   Next  copy this files into site module

hmvc_ci/application/modules/site/controllers/site.php
hmvc_ci/application/modules/site/views/logged_in_area.php

5-  Open “hmvc_ci/application/config/autoload.php” and edit it to look like the this:


If you have not already done so from step one, open “hmvc_ci/application/config/config.php” and edit it so that the base url is set to your appropriate location.

$config[‘base_url’]     = ‘http://localhost/hmvc_ci‘;

6-  Open “hmvc_ci/application/config/database.php” and add the appropriate links to your database.

[php]

$db[‘default’][‘hostname’] = “localhost”;                                       //  location of DB serverdb[‘default’]
[‘username’] = “YOUR USERNAME HERE”;                              // username you use to connect
$db[‘default’][‘password’] = “YOUR PASSWORD HERE”;       // associated password
$db[‘default’][‘database’] = “hmvc_ci”;                                         // The database you want to use

[/php]

7-   Create this table from sql in phpmyadmin

[php]

CREATE TABLE  `hmvc_ci`.`membership` (

`id` INT( 11 ) NOT NULL AUTO_INCREMENT PRIMARY KEY ,
`first_name` VARCHAR( 32 ) NOT NULL ,
`last_name` VARCHAR( 32 ) NOT NULL ,
`email_address` VARCHAR( 64 ) NOT NULL ,
`username` VARCHAR( 32 ) NOT NULL ,
`password` VARCHAR( 32 ) NOT NULL

) ENGINE = MYISAM ;

[/php]

8 – So we have our triads grouped, but we are still not quite in HMVC mode yet. In the site controller we find a function called is_logged_in() which check if user logged in or not .

[php]

function is_logged_in(){

$is_logged_in = $this->session->userdata(‘is_logged_in’);
if(!isset($is_logged_in) || $is_logged_in != true){

echo ‘You don’t have permission to access this page. <a href=”../login”>Login</a>’;
die();

}

}

[/php]

This is a login related function. In MVC mode, this is required because site cannot access login. With HMVC we can fix this.
In other way we collect related functions to other class and run what we need from it it’s good for big projects based on many views we handle that by hmvc and here we go i’ll demonstrate that in login function

  • Cut the is_logged_in() function out of “applications/modules/site/controllers/site.php
  • Save site.php without the is_logged_in() function.
  • Open “applications/modules/login/controllers/login.php“.
  • Paste the is_logged_in() function into the class.
  • Save login.php and code will be like that

9 – Open “applications/modules/site/controllers/site.php“.


Note : for CI 2.x like my examples login function should be like this

[php]

function is_logged_in($session){

$is_logged_in = $session->userdata(‘is_logged_in’);
if(!isset($is_logged_in) || $is_logged_in != true)
{

echo ‘You don’t have permission to access this page. <a href=”../login”>Login</a>’;
die();
//$this->load->view(‘login_form’);

}

}

[/php]


10-       Site controller  __construct should be like this


In chapter three we will demonstrate more example on HMVC for user profile member
after user login we will give every user control panel
Wait our demo !
Best regards 🙂


Leave a comment

Posted by on November 18, 2011 in Back-end, Design Patterns, Featured, Programming


HMVC

Intro:-

     In this tutorial I will demonstrate the Hierarchical Model View Controller(HMVC) pattern, and how it applies to web application development. For this tutorial, I will use examples provided by CodeIgniter  rapid php framework, and explain how HMVC can be a valuable modification to your development process.
This Introduction assumes you have an understanding of the Model View Controller (MVC) Pattern. We suggest you read this article [ Introduction to MVC ] to get acquainted with the topic before tackling this tutorial.

What is HMVC?

     HMVC is an evolution of the MVC pattern used for most web applications today. It came about as an answer to the salability problems apparent within applications which used MVC.
The solution presented in the JavaWorld web site, July 2000, proposed that the standard Model, View, and Controller triad become layered into a “hierarchy of parent-child MCV layers“. The image below illustrates how this works.

Each triad functions independently from one another. A triad can request access to another triad via their controllers. Both of these points allow the application to be distributed over multiple locations, if needed. In addition, the layering of MVC triads allows for a more in depth and robust application development. This leads to several advantages which brings us to our next point.

Why should I use HMVC?

     Key advantages to implementing the HMVC pattern in your development cycle:

  • Modularization: Reduction of dependencies between the disparate parts of the application.
  • Organization: Having a folder for each of the relevant triads makes for a lighter work load.
  • Reusability: By nature of the design it is easy to reuse nearly every piece of code.
  • Extendibility: Makes the application more extensible without sacrificing ease of maintenance.

These advantages will allow you to get M.O.R.E out of your application with less headaches.

Setting up Code igniter:-

Requirement :-

  1. Download code Igniter from here
  2. Extract the content of the Zip file to your web server’s document root.
  3. Rename the codeigniter zip to hmvc_ci
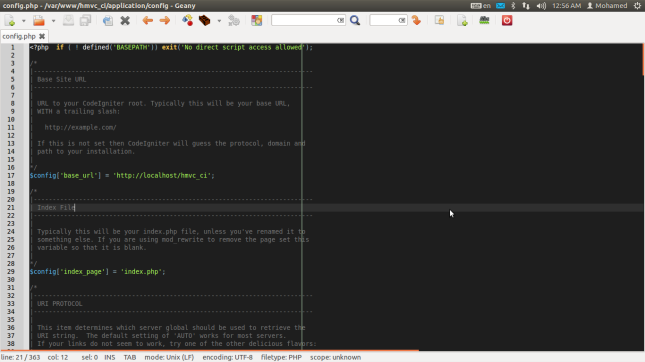
  4. open “hmvc_ci/application/config/config.php”
  5. locate $config[‘url’] var
  6. change it to your needs… for me it’s “localhost/hmvc_ci”
Screenshot for HMVC
Test that we have a working version of code igniter.
Open your browser and check “http://localhost/hmvc_ci&#8221;.
You should be greeted with the “Welcome to Code igniter” screen.
Then Download and Install HMVC extension.
Download version 5.2 of the modular extension from here .
Move Core folder files to code igniter core folder and third party MX folder to third party code igniter folder.
Recheck your browser…You should still see the Welcome to code igniter screen.
It’s time to add the modules:-
Create the following directory structure. “application/modules/welcome/controllers/”.
Move the “application/view/welcome_message.php” to “application/modules/welcome/view/welcome_message.php”
Do a final check to your browser. You should still see the Welcome to Code igniter screen. That’s it! Modular extensions is installed correctly.
For now we demonstrate what is HMVC design pattern and why should we use it and how to install HMVC on code igniter php framework
In next chapter I will show you some examples in real life HMVC
keep in touch 🙂
 
Leave a comment

Posted by on November 3, 2011 in Back-end, Web